Monday, June 29, 2009

Kidlet: Wall Pocket - Tidy Tote

When I found that awesome kiddie art organizer - the Crayon Wallet pattern (read my Crayon Wallet post here), I came across Jennifer's Kidlet PDF pattern on her blog. It's an ingenious and artistic solution to store my DD's toys that I'm constantly finding abandoned all over the house!

Here's the story behind the Kidlet:

"While out for a walk with my little ones one day, I was thinking about ways to creatively encourage them to pick up after themselves. I wanted something large enough to hold a bunch of books or softies, but small enough to use unobtrusively throughout our home. Kidlet has a deep gusset to accommodate lots and lots of the "stuff" that's always lying around and has a handy strap to fit over a doorknob. It's plenty sturdy for wee ones to carry their precious goodies themselves and you needn't worry about them fiddling with a long strap. Put up a few fun hooks for a row of Kidlets in the playroom, or strategically hang them over doorknobs throughout the house." - Jennifer Casa

Jennifer used to sell the Kidlet pattern in her Ebay store, JCasa, but now she offers the PDF file as a free download on her blog! Nice!

This weekend I finally got around to sewing three of them for Serenity's room. It took very little fabric; I used small pieces of scrap material from other projects, and left-over canvas fabric Wal-Mart had marked down that I found months ago. I decided to put them on Serenity's "bookcase tower" of her castle bed, and I used inexpensive, plain white hooks to hang them up.

As soon as I finished, Serenity started singing the Barney "Clean Up" song, and then put her toys in the Kidlets! Smart baby girl! The cleaning might not last, and I'm pretty sure it's only because the totes are a kind of a fun novelty thing right now, and the compulsion to clean up will, more than likely, wear off quick. {sigh}

But she does like the totes, and I think that's because of the kid-friendly material I used. The Kidlet is a smart and creative organizer and I plan to make a few more to hang up all around Serenity's room. If there is even the slightest chance it'll entice her to keep her room clean, then I'm all for it!!

I probably need to add a few Kidlets on the top of her castle bed. It's where her bed and "lounging area" is at - she's always dragging a ton of toys up there. That part of her castle stays messier than the floor!

BTW, Serenity's castle bed was a joint effort of my family coming together (with no or very little woodworking skills) for a week, and building this HUGE Castle Loft Bed, using only pictures I found on Picasa of a Castle Bed built by DaveMC for his little girls. Click on the links so you can go see the pictures of us building Serenity's bed, and get a bit of an idea of how we did it. You can see how DaveMC built his little girl's bed too. Somehow (I told you we didn't really know what we were doing), we miscalculated on the width of the bedroom and almost didn't have enough room for it to fit! Serenity LOVES her bed, actually every kid from 2 to 22 loves her bed! My sister is 22 and said she wished she had a bed like that growing up! Well, tell you the truth - so do I!!

POST-IT NOTE: I think Kidlets would make cute birthday party gift bags for the guests to take home!

The pattern is easy to follow and it's very simple to alter it to fit your needs. I made my Kidlets a tad smaller than the one in the instructions, and I used canvas for my handles instead of cotton webbing. On two of the totes, I used heavy fusible interfacing and the result was a much stiffer tote, but since I was using a canvas fabric it got kinda hard to sew in a few places. I probably won't use any interfacing on my next canvas totes, but it's a good idea to use it when you're working with regular cotton fabric.

Head on over to Jennifer's blog to get your free Kidlet pattern download. It'll only take about an hour or so to sew each tote. Jennifer offers a quite few other awesome PDF patterns and tutorials that are available to download for free too. Go have a look-see at her blog today!

Have fun!

StumbleUpon.com

Friday, June 26, 2009

Laundry Soap Alternatives - Be Cheap! Go Green!

Charlie's Soap:
It's been about 10 months since I've used commercial laundry detergents. My favorite was Gain - loved the smell! I used it for years, and before that I used Tide. Tide reminds me of home - my Mama still uses it!

But last year, when I started to use cloth diapers instead of store-bought, I kept reading over and over that the best way to get cloth diapers clean was to use Charlie's Soap. Not only would it clean them, it left no residue behind which made them more absorbent. A lot of Ebay sellers recommended using Charlie's Soap on their diapers. I ended up buying some cloth diapers from an Ebay seller that offered a free sack of Charlie's Laundry powder too. The sack was TINY, but it said it would do 80 loads (each load only used 1 TBSP!), but man it was TINY - no way it did 80 loads, right?!

Wrong!

It worked great! So I bought a gallon jug of Charlie's Soap from their website too. A gallon will clean 128 loads. You only use 1/8 cup of soap - that's all I swear it! If you order more than $28 shipping is free! A couple of days ago, I bought 2 1-gallon jugs of liquid soap at $45.62, with a $3.97 discount and free shipping! That's about 18¢ a load.

Cheap, cheap, cheap!!

Charlie's Soap is a "Safe, Non toxic, Biodegradable Soap". They brag that it "cleans everything" and it's back with a 100% money back guarantee: "If you're not completely satisfied, we will, but not gladly, refund the buyer's purchase price". Funny!


After using Charlie's Soap, I was totally hooked - and I'll never go back to using commercial laundry detergent again - unless some totally strange, unforeseen problem comes up and somehow I can't get it anymore or whatever. It really, truly, completely cleans your clothes - as promised. You don't even need fabric softeners! Before you clean your first load, you'll have to get rid of all the old gunk in your washer that was left behind by commercial detergents. You just add a few old towels, a scoop of Charlie's Soap, then turn on your washer.

All clean and ready to go!

But to really get your washing machine clean (which you should do periodically), Making Do With The Not So New recommends heading over to The Diaper Hyena to learn how to really get your machine clean!

Soap Nuts:
Now Charlie's Soap is my favorite because there's no hassle - it's so easy, but in Janurary I discovered Soap Nuts (sounds kinda kinky, huh?), and found another laundry soap favorite - but I still love Charlie's Soap the best! Soap Nuts, or sapindus, grows on trees and bushes. You can do a lot more with it than just wash clothes. It's an all-purpose cleaner for your windows, jewerly, hair, dishes, and carpets. But it can also be used as a plant wash, and even a pest repllent! Keep seaching the internet, I'm sure you can find more uses for Soap Nuts!

Wikipedia describes Sapindus (Soap Nuts or Soapberry) as:

"Soap nuts contain saponins, a natural surfactant. They have been used for washing for thousands of years by various peoples, such as the Native Americans.Today, soapberries are being considered for commercial use in cosmetics and detergents, among many other products.Soap nuts, especially are used medically as an expectorant, emetic, contraceptive, and for treatment of excessive salivation, epilepsy, chlorosis, migraines, and diabetes. Studies show that saponin from soap nuts inhibits tumor cell growth and the progression of AIDS."


Go to Wikipedia to read more about Soap Nuts. You can Google "soap nuts" too and get around 815,000 hits.

I bought mine on Amazon.com from NaturOli when their 5lb bag of Soap Nut pieces went on sale for only $39.95, but alas, shipping was not free. NaturOli claims the pieces would clean 800 loads at about 8¢ a load. Hmmm, maybe, but I think that's a stretch since they weren't including S/H prices! I bought 2 5lb bags and 6 extra muslin bags ($6) - I wanted to share the Soap Nuts with some of my family and friends. Anyway, all together, my price was $119.37. So if I do end up getting 1600 loads out of 10lbs of Soap Nuts, and then minus the cost of the muslin bags, that would be around 14¢ a load. Pretty good - but I'm not sure I got 1600 loads! I gave a lot of it away, and I still have a good bit left. I haven't kept track of how many loads I've gotten out my purchase, but I do know it's been a lot.

They do an excellent good job at cleaning your clothes too - I have no complaints in that department at all. The Soap Nuts smell a little like vinegar, but that goes away once you use it, then it just leaves your clothes smelling fresh and clean. If you've been using commercial laundry detergents, you'll have to prepare your washing machine, just like you'd do if you use Charlie's Soap for the first time.

There are several different ways you can use the Soap Nuts in your washer:

1. You can add a few in the little muslin bag that will come with your order and toss it into your washing machine. If you do it that way, I suggest soaking the Soap Nuts before you use them. It helps to release the saponin. I used to keep a jar of water near my washing machine and toss in the little muslin bags filled with soap nuts after every wash. Once the Soap Nuts stop feeling "slippery" after they've soaked, throw them out or put them in your compost, then add some fresh pieces to your muslin bag.

2. Another way is to make your own Soap Nuts liquid detergent. You can find all kinds of recipes online, or come up with your own variation. Whatever recipe you decide to use, basically depends on how concentrated you want your mixture. I wholeheartedly recommend making your own liquid detergent - I think it's the most convenient method. It's pretty simple too; buysoapnuts.com suggests making it this way:

"Boil approximately 12-15 whole soapnuts with 6 cups of water for 30 minutes. When it is boiled down, you will have about 4c. of liquid left. Add extra water, if needed, to keep it at that amount. When cooled, remove the soap nuts, and pour the liquid into an airtight plastic or glass jar. It is better to make the liquid in smaller batches as it can spoil. Experiment with making liquid to see if you prefer a more concentrated version, using 3 cups water instead of 6 cups. Some prefer the concentrated liquid for handwashing and shampoo."

3. Or you can grind the Soap Nuts into powder yourself and never stop sneezing or filtering all those tiny pieces that never seem to go away over and over and over again. Stay far, far, FAR away from this method! Trust. Me. I did it and it was a complete nightmare. If you must have Soap Nuts powder - buy it. Under no circumstances should you attempt to make it yourself! I broke my Magic Bullet grinding up all those damn Soap Nuts! I had to use my metal strainer that has etsy teeny tiny holes to filter out just some (it couldn't catch them all) of the shells that refused to grind to dust - and speaking of dust! UGH! It was everywhere! Up my nose especially! I couldn't stop sneezing. I think it was the combination of the dust and that vinegary smell - it was awful. Once my Magic Bullet broke, I had to give it up, but I did end up with a good bit a powder when the horrible nightmare was finally over. It took only about 1-2 TBSP to clean of a load of clothes, but even though I filtered the stuff a ton of times, it was still full of shells - and that can clog your dryer filter and stay in your clothes. Not good. So on the shelf it sat.

Until...

I ran out of Charlie's Soap and I decided to tackle using the Soap Nut powder again. I wanted to take all the Soap Nut powder I had left and turn it into liquid - and I didn't want to go through putting it on the stove and cooking it down for 30 minutes. So I just soaked the powder in HOT water for about 20 minutes for each batch until all the powder was gone. It was NOT easy. I used a whisk to break up all the powder clumps, and I still had to strain the liquid to make sure no shells or thick residue got into my liquid. I used the gold coffee filter from my coffee machine as my stainer - it worked.

So now I have slightly more than a gallon (I used the empty Charlie's Soap jug and an empty plastic water bottle) of highly concentrated Soap Nut liquid. And let me tell you, I will never, NEVER EVER, grind up Soap Nuts again! EVER!

Unless I have a gas mask and an industrial food processor - then, maybe - if I was paid - a lot - then again, maybe not. I'd have to think about it - long and hard, it might take me a year of deep, deep mediation. Who knows, maybe by then that damn vinegary smell and the feel of that clingy powder will fade from my memory, then again - probably NOT!

Deep breath... hold it... exhale... and relax!

Homemade Laundry Soap:
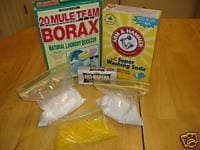
You can also make your own laundry soap from bar soap, Borax, and Arm & Hammer Washing Soda, that is if you can find the ingredients in your area. I can't, but I'm still looking!

Frugal Upstate recommends using Zote, Ivory, or any bar soap you choose - even those little trial-size ones you get at hotels!

1 cup grated Soap
1/2 cup Washing Soda
1/2 cup Borax
Mix together and use 1 Tablespoon per load, 2 Tablespoons if it is a really soiled load.
Check out her video:


I can find Borax with no problem, but I haven't seen Arm & Hammer Washing Soda anywhere in Houma. I could order it from Amazon.com, but S/H is not free, even with Amazon Prime. Today on thriftyfun.com, I found a post with a 1-800 number to call. The poster said if you call: 1-800-524-1328 and order more than two boxes (@3.99 each), S/H is free. That's the best online deal I've found yet.


I can't find Fels Naptha or Colgate laundry bar soaps anywhere locally either! I did find a couple of places online.Amazon.com has it for $4.99 & free S/H (it went down a $1 since the last time I looked at it) - that sounds expensive even with the $1 off. Soaps Gone Buy offers it for only 99¢ and $4.95 S/H for up to 7 bars.

Making Do With The Not So New has a nice picture tutorial for Fel-Naptha Homemade Laundry Soap on her blog here. She breaks down the costs too. Go check it out and while you're there, have a look 'round at all her other money-saving tips!

Little Birdie Secrets has a wonderful Homemade Laundry Liquid Soap picture tutorial. It's the first one I've found for the liquid version of the Fel-Naptha homemade laundry soap. She also introduces you to Good Mama's Wool Dryer Balls tutorial. No need to buy dryer sheets anymore! Homemade wool dryer balls will save you a ton!

If you simply can't find some or all of the ingredients in your area, you could try Homemade Soap Kits. Soaps Gone Buy offers two different kits. One with 7 bars of Fel-Naptha, 1 box of Arm & Hammer Washing Soda, and 1 box of Borax for $19.95. The other kit is almost the same, but you get 2 pounds of grated Fel-Naptha & 1 whole bar for $26.95.


Colby Soaps on Etsy has a 96-load Fel-Naptha kit for only 99¢ & $6.50 S/H - I wonder if that is a typo? If not, that's about 8¢ a load!


They also sell a ready-to-use 96-load Fel-Naptha laundry soap for $1.99 & $6.60 S/H. That would be around 9¢ a load! I think I might give that one a try. It's like buying a little sample pack; if I like it, then I could go ahead, buy all the ingredients and make it myself.

Depending how how you make it, every one's saving will vary. Check out Frugal Upstate's Homemade Laundry Soap savings:

"A pkg of Tide is $9.47 for 22 loads on Drugstore.com. That is about $.43 a load.
So for the math for a load of laundry with homemade detergent (rounding down):
Borax is $5 for 76 oz, at 16 oz a cup, for 1/2 C:
$5 / (76/(16*2))= $.55 per one half cup portion
Washing Soda is $2.50 for 55 oz, at 16 oz a cup, for 1/2 C:
$2.50 (55/(16*2))= $.36 per one half cup portion
Zote Soap is $1 a bar
So that is $1.91 for a batch of laundry soap that is approx 2 cups (or 32 TBS). Lets assume that all of your loads are very soiled and require 2TBS each (or 16 loads from that batch). That ends up at about $.12 a load compared to the $.43 for the Tide."
--------------------------------------------------------
Any one of these alternatives are better than commercial laundry detergents. Much better for your skin and you wouldn't believe how clean and fluffy your clothes will be after using these Green laundry soaps. NaturOli won a green dot award for their products, but Charlie's Soap is as Green as it gets too. As for the Homemade Laundry Powder, it's pretty darn green too! Borax and washing soda are both naturally occurring and non-toxic and Fel-Naptha is pure soap. Sounds Green to me!

POST-IT NOTE: Also, I never use bleach anymore. If something has a stain on it, I "doctor it" (as my Granny used to say) with a Tide Pen and/or OxiClean laundry stain remover before I put it into the wash, and I also add OxiClean to every load. It gets the stains out just fine, and as far as I know, OxiClean is Green too! If you have some information that says differently, please comment and let me know. You could make your own OxiClean and then you'll know for sure it's Green. To make Homemade OxiClean you only need Hydrogen Peroxide and Washing Soda (if you can find it). There are a ton of recipes on the net, but I found this one at Making Do With The Not So New that you might want to try out. eHow has an OxiClean recipe too. And for an even more in-depth look at OxiClean, go read The Truth Behind Oxiclean!

POST-IT NOTE 2: BTW, if you miss the smell of fresh flowers, or lavender or whatever in your clothes, then there are a couple of things you can do. Add essential oils to a damp wash cloth, then toss it in your dryer with your clothes for a pleasant smell. Or do what Frugal Upstate suggests, and soak a few {cheap} cut-up sponges in 1 part {cheap} fabric softener to 8 parts water in a container. Then just squeeze out a sponge until its still a little damp, and throw it into your dryer with your clothes! It leaves behind a nice & light smell on your clothes. It works, I tried it.
Have fun!

StumbleUpon.com

Saturday, June 20, 2009

Bias Tape Tutorial

The last two dresses I made for Serenity (the Round Neck Top/Sundress and Caroline Dress) both recommended handmade bias tape around the armholes in fabric that would coordinate with the dresses. I could've used store-bought, but the dresses wouldn't have had the look I wanted.

Making handmade bias tape is time-consuming and tedious to say the least. The cutting out part isn't so bad - it's the folding that gets my goat!

And
burns my fingers!

But today while surfing sewing blogs on the net, I came across this incredibly simple and easy bias-folding tutorial. Maybe it's one of those old secret techniques that every semstress knows, but since I'm just a step up from a beginner, I never knew about it! I found it so very clever and helpful!

You've got to watch this video:


The video was created by The Green Wife based on a bias tape tutorial by Creative Little Daisy. Both blogs are very interesting with some great tutorials posted. Go check them out today!

And if don't know how to cut your own bias tape, click here for a tutorial that might help you with that too!

For the "No Swearing Bias Tape Method" of attaching bias tape check out this funny video:


Clover® makes handy little bias tape makers in different sizes (all under $10) - something else I didn't know about before today! I even found a video on youtube.com that shows you how to the neat little gadget:


Or if you have the bucks, you might want to try the Simplicity Bias Tape Maker for $100 at Amazon.com. You cut the fabric out yourself like usual, wind it around a spool, and then press a button for perfectly folded bias tape! That's pretty expensive for a machine that only folds the tape - I'd much rather the cheap pin and iron board method! However... I do like the Simplicity Rotary Cutting Machine, now that's something I would like to get. But I guess I don't really need it [sigh], hand cutting and ripping is a lot cheaper!

Have fun making your own bias tape!

StumbleUpon.com

Vintage Baby

I recently purchased Frog Legs and Ponytails' Caroline Dress PDF pattern for only $9.99.The pattern includes sizes 0-8 and a matching doll pattern! It's a beautiful dress and the instructions are very clear and detailed with a few helpful tips too. You can tell a lot of time and effort went into the making of this pattern.

Using the Caroline Dress pattern and inspired by ZoZoBugBaby's beautiful Karaleigh Dress, I made a lovely dress for Serenity last night. The Karaleigh Dress is similar to the Caroline Dress, but it has a gorgeous double ruffle at the bottom instead of a band. It's so girly and twirly! Both of the dresses are kinda like "pillowcase"dresses, but so much more charming! I am totally impressed at the wonderful fabric combinations Julie comes up with when she designs her clothes!

Stunning!

While my fabric combo isn't nearly as striking as Julie's, I think I did a pretty good job sewing my first "pillowcase" dress! I played around in Photoshop again using Pioneer Woman's free action sets: 1 & 2 and got these cool vintagey type results:


Please ignore the dog hair all over Serenity's dress! Gizmo (or Gizzy Mo!), my Japanese Chin, sheds like crazy and his longs white hairs really showed up on that black & while polka dot ruffle fabric!


If you're looking for a beautiful Summery dress, get ZoZoBugBaby's Karaleigh Dress for your DD - it's a fabulous piece of wearable art!

POST-IT NOTE: ZoZoBugBaby's $10 skirt sale starts tomorrow at 8AM PST (or 10AM CST). Plan to hit her store during that time! Hurry and place your orders quick! Last time Julie's skirts went on sale, they sold within 3 minutes of posting!! I'm hoping I can grab a couple for Serenity before she sells out!! And don't for get to check out the ZoZoBugBaby blog for all of Julie's latest updates!

The Frog Legs and Ponytails' Caroline Dress PDF pattern was worth every penny too! If you're looking for an "uptown & classy" pillowcase dress pattern, then this pattern is the one to buy!

Have fun sewing!

StumbleUpon.com

Friday, June 19, 2009

Photoshop Actions

What are Photoshop Actions?

"An action is a series of tasks that you play back on a single file or a batch of files - menu commands, palette options, tool actions, and so on. You can create an action that changes the size of an image, applies a filter to the image for a particular effect, and then saves the file in the desired format. Nice, isn’t it ! Actions can include stops that let you perform tasks that cannot be recorded (for example, using a painting tool). Photoshop and Illustrator come with predefined actions installed that help you perform common tasks. You can use these actions as is, customize them to meet your needs, or create new actions. Actions are stored in sets to help you organize them. You can record, edit, customize, and batch-process actions, and you can manage groups of actions by working with action sets."


I recently discovered Photoshop actions and I can't get enough!! I've always wondered how to get those beautiful color-saturated "professional" looking pictures. People have told me I take pretty good pictures, but to me, they seemed kinda washed out, compared to how I wanted them to look. So I did some research on the net, and finally figured out why my pictures didn't look the way I really wanted them to and how to make them to look that way!

I've said it before, but it bears repeating over and over: I LOVE the internet!! So much information!!! It's like having a giant book that never ends! Ooops! Did my geekyness just show? Lol!

Okay, I'll stop drooling and continue...

I've been playing around with Photoshop using some free actions I've found on the internet and getting some amazing results. I mentioned in an earlier post about Pioneer Woman's free action sets: 1 & 2; I recommend you download and try them out today! You can find lots more free Photoshop actions all over the net. DeviantART and Visual-Blast have free actions to download too. Also, try Googling "free photoshop actions", and you'll get around 6,500,000 hits!

Wow!

If you have a particular set of techniques you use over and over, you may be interested in learning how to make your own Photoshop actions. You can find thousands of tutorials all over the internet. I used this tutorial to create an action to add my watermark to all of my pictures. Since learning the technique, I've made several different watermark actions; I don't always use the same one. It was a very easy technique to learn.

Scrapbook magazines offer great photography tips too. I recently bought a magazine by Scrapbooks, etc. that is filled with tips and tricks. You can visit their website for even more photography help.

Here's a couple of pictures I took of Serenity today that I tweaked in Photoshop using several actions I found on the internet.

Check out these awesome results:


The original picture, straight from my camera, is on the left. The picture on the right has been Photoshopped.


Both of these have been Photoshopped.


The original picture, straight from my camera, is on the left. The picture on the right has been Photoshopped.

Both of these have been Photoshopped.

Pretty neat, huh?! Photoshop actions will make your pictures POP! The key is practice, practice, practice! To get the results above, I mixed around 7 different actions together - more is better!

Yep! Serenity's wearing her one-of-a-kind dress from courtneycourtney - don't forget to check out Courtney's store on Etsy and get your DD one of her beautiful dresses today!!

Have fun!

StumbleUpon.com

Thursday, June 18, 2009

Round Neck Sundress by That Darn Kat

Last night I tried That Darn Kat's Round Neck Top/Sundress pattern ($9.95) for the first time. You can find it at YCMT.com. I ended up adding a rolled hemmed ruffle at the bottom of the dress instead of the band to change the look of it a tad bit. I'm so pleased with the results!

Next time I might sew a longer dress with a ruffle to see how that'll turn out, but I had specific look in mind that I wanted to try. I was wondering how it would look if Serenity wore a pair of knee length leggings ($3.99 at Target) with a short ruffled round neck sundress. Well, I think it turned out to be a really cute Summer outfit!

Whaddya think?


I used Heather Bailey's beautiful and bright Pop Garden Paisley Lime and Pink Peonies fabrics. You should be able to find it at your local quilt shop, or on Ebay like I did. Etsy has sellers with excellent fabrics too! Anthem Fabrics, Sew Love Fabrics, Aliyah's Hope Chest, Fabric Bee, and Marie-Madeline Studio all have a wonderful, large selection of beautiful fabrics.

That Darn Kat's Round Neck Top/Sundress pattern is a fairly easy project to sew. It'll be a breeze for intermediate sewers, but a beginner shouldn't have a problem either. The pattern has extremely detailed instructions with lots of helpful step by step photos. Just make sure to take your time and read all the instructions carefully. You'll be very happy with your results if you do!

Have fun sewing!

StumbleUpon.com

Tuesday, June 16, 2009

Caramel Iced Coffee


Caramel Iced Coffee:

2 ounces coffee concentrate
1 cup milk
Smucker's Caramel (or Chocolate) Sundae Syrup
Ice

Mix the concentrate and milk together, then stir in a couple/few squirts of caramel syrup and add some ice cubes.

Enjoy!
-------------------------------------

I've made a second batch of cold-brew coffee concentrate and I think I got the water/coffee ratio right this time.

I used Community Coffee's Kenya whole bean coffee (12oz); it's a medium-dark roast from their Private Reserve collection, but it's only available for a limited time. I used
Rouses grinder, on the "coarse" setting, to grind the beans so I didn't have to do it at home - a good tip I found from a reviewer on Amazon.com. Rouses doesn't charge you extra to grind the beans either - nice. Only grind your beans at the grocery store if you're planning on using the coffee grounds right away! Fresh is better!

I also tried another tip from a reviewer on Amazon.com and reused the coffee grounds.

Okay, so here's what I did this go 'round:

1. Insert the plug to the outside bottom of the plastic container.
2. Make sure the filter is very wet, then put it in the inside bottom of the plastic container.
3. Pour 2 cups water into plastic container.
4. Add all 12 ounces of the coarse ground coffee beans.
5. In a gentle circular motion pour 2 cups of water.
6. Wait 5 minutes and pour 2 more cups of water. Press any grounds down with the back of a spoon - try not to stir.
8. Wait 14 hours.
9. Pull the plug while holding the plastic container over the glass decanter.
10. Put the plug back into the plastic container.
11. Add 4 more cups of water - don't stir! Use your spoon to tap the grounds down.
12. Wait 10 hours.
13. Pull the plug while holding the plastic container over the glass decanter.
14. It fills the glass decanter almost to the top - about 7 cups (56 ounces). The rest of the water is soaked up by the grounds. Don't squeeze the water out of the grounds!

The result is a much stronger coffee concentrate, but it's still very smooth and not bitter. I use 2 ounces coffee concentrate to make an 8 ounce cup of coffee, it tastes delicious and smells wonderful!

It makes a delicious iced coffee too.


Have fun!

StumbleUpon.com

Sunday, June 7, 2009

Sarah's Glamorous Photo Shoot

Yesterday, I took Sarah out & about for her very own "glamorous photo shoot" - just like Kelsey. She was a very good model and her pictures turned out magnificent! Here are some of the results:


These were taken at St. Martin's. I love bright colors and how Sarah is posing in both these shots.


The one on left is at St. Martin's. It looks like she's floating. I think it's her "Angel" picture. I intentionally blurred the edges around Sarah to give the shot a more "afterlife" effect. The one on the right is near Uptown in Houma. I enhanced every bit of blue in this shot, and I'm so pleased how it turned out. Sarah's outfit appears blue, but she's actually wearing a grey shirt - not blue! I love the way that gorgeous deep blue looks against the beautiful old red brick, the effect is quite striking! I also "airbrushed" Sarah's name on the wall - neat, huh? I had to take a crash mini-course online to learn how to do that!


Taken at St. Martin's. Unquestionably stunning. I really like her outfit too, she looks like a throw-back to the 80's! The big shirt/legging style is coming back. Oh my!


Taken at St. Martin's. These poses are very whimsical. Sarah was such a splendid model.


Taken at the Railroad tracks in Thibodaux. The first one is cute and funny - look at that smile! The second one looks like Sarah's punk rock album cover! Dude, she's so cool!


The top one was near the Intracoastal Canal. I enhanced all the blue in this photo. I absolutely LOVE the results! the bottom one was at the railroad tracks in Thibodaux. Look at her sassy little bow smile!!


Taken at St. Martin's. The one on the top is Sarah's favorite. I like the angle too, I was able to get the gazebo, the bayou, and a beautiful smile from Sarah all in the same shot. As for the picture on the bottom, I gave this one a "soft" look to achieve that "ghostly" effect. We were on the grounds of a very old house, so I needed at least one "spooky" shot!


Hope you enjoyed the new pics! Thanks for stopping by!

StumbleUpon.com

Saturday, June 6, 2009

Adorable Crochet Skirts

I crocheted two skirts for Serenity using the cutest pattern I bought over at Dutch Knitting Design for only $7! The pattern is extremely detailed with lots of helpful information and tips. The skirts were very easy to make, and taking my time, it only took a couple of hours to complete a size 2 skirt.

On Wednesday I made the first skirt. The colors remind me of sherbet so that's what I'm gonna call it! Here's Serenity wearing her "Sherbet Skirt":

I got so many compliments; everyone wanted to know where I bought it!

For the second skirt, I was inspired by Alice over at futuregir!.com.

BTW: Check out her new post: Tutorial: Foundation Single Crochet - Supplement. It's a follow-up for her Foundation Single Crochet Tutorial.

She made one of her beautiful handbags for a friend that was blue with a couple of darling felt daisies. Alice even has an easy picture tutorial showing you step-by-step how she made the those little daisies! What a sweet look for a toddler skirt! So Thursday night I whipped up another skirt:


LOVE it! She even has a pair of daisy shoes to match! Everyone kept going on and on about how pretty Serenity was wearing her "Sweet As A Daisy Skirt"!

Of course I plan to make more of these! My next projects will be two skirts for the 4th of July. I'm making one for Serenity and one for my friend's little girl, Cobee Lynn. I'll try to get pictures of both of the girls together wearing their outfits and post 'em! Cobee Lynn is adorable and I've got to get some pictures of her wearing at least one of the outfits I made her!!

It's inexpensive to crochet too. I only used around 2 skeins of Sugar 'n Cream cotton yarn. It's kinda more expensive than worsted yarn, but you can pretty much use whatever yarn you want to change the look of the skirt. My costs for the yarn was about $1.89 per skein. If you need to make a larger sized skirt for a tween or older, using cotton yarn can get very expensive. I'd use worsted or sport yarn for a bigger skirt since it'll keep costs cheap.

For the sweetest little crochet skirt pattern, go check out Dutch Knitting Design. They have lots of other patterns that you might be interested in too!

POST-IT NOTE: Even though I've been crocheting for years, I still find the need to clarify some little (or huge) technique or have a question I need help answering. At Micheal's a few months ago, I came across probably the smallest, most helpful crochet handbook I've ever seen. It's called The Crochet Answer Book ($10.15 & free shipping w/Amazon Prime). GET IT! It'll be the best little crochet book you'll ever buy!

Have fun crocheting your next project!

StumbleUpon.com

Wednesday, June 3, 2009

Handmade Crochet Stitch Markers

Right now I'm crocheting a skirt for Serenity using a pattern I found on Etsy by Dutch Knitting Design. After ripping out my work twice, I realized I needed something to keep track of my chains, 1st. stitch, rows, right side, and all that other crochet stuff. Hmmm... think, think, think - I know (as Serenity would say)! Stitch markers! I remember reading how Alice over at furturgir!.com, used a ton of markers when creating her beautiful handbags. In fact, she even has a "paper clip stitch markers" tutorial posted on her blog. Cheap & incredibly useful! I never needed stitch markers when I was younger; I just kinda winged it. They would be very handy to have now though!

So I did a quick Google search "make crochet stitch markers" for some more ideas, and got 132,ooo hits. I liked Alice's tutorial too, but I didn't have paper clips last night, so I improvised. I used a safety pen, and I broke apart a old beaded necklace (that I don't think I've ever worn), and made my own stitch marker. I use the beads and clasps from the necklace, and a small piece of embroidery floss. It's cute, but I think I need just a few more to really mark my project - and future projects.

Since all my bracelet making stuff is in storage (and no way I'm digging through all
that by myself!), I stopped at Michael's (Wal-Mart has a pretty okay selection of beads and findings too) today and picked up some beads, jump rings, pins w/rhinestones, lobster claps, and mini needle nose pliers:

I used one big bead and two small ones, a lobster clasp, jump ring, and pin to make each marker:

Here are my markers. I made the one the far right from the old necklace.

Here's a picture of the markers attached to Serenity skirt:

BTW: The crochet hook has a flower hand that was handmade from polymer clay. I first saw these pretty (and comfortable to use) hooks over at PlanetJune and followed the link back to The Fanciful Feline on Etsy. For years now, my hands have started to cramp so bad I haven't been able to crochet. I used to make big, beautiful afghans but had to quit because my hands would hurt so bad almost as soon as I'd start crocheting. I just started crocheting again, but only to do quick and easy projects - like halter tops for Serenity, but I had to put down my work often to rest my hands. I made Serenity's skirt using this crochet hook, and it was a HUGE difference. My hands didn't hurt - and only after a long time of crocheting did they even ache, but that's perfectly normal! I probably should've invested in some kind of cushion a long time ago. The hooks at The Fanciful Feline are not only beautiful, but very comfortable to use too! Go check 'em out today.

Anyhoo...

I like the way my markers came out - I'll probably make more soon. I think I would like a few more using embroidery floss. The beaded floss marker is much more flexible than the wire markers; plus it's very light!

If you want to make your own, use any type of beads, wire, embroidery floss, earring hooks, leverback clasps, lobster clasps, or whatever you want. You can make them very cheap & cute
or expensive & exquisite (having fun wit da words). It's totally up to your budget and imagination!

While at Michael's, I almost bought a Super Style Kit - the pink one. It has everything you need to start making all kinds of different jewelry - for only around $25. Not too bad. But those red beads caught my eye first and I couldn't resist! Michael's had a few other interesting kits you might want to have a gander at too!

UPDATE - While on youtube today, I found some videos of how to make stitch markers that you might find helpful. Go check 'em out! A good place for wholesale beads, findings, clasps, and tons more, go to Fire Mountain Gems and Beads. I found this excellent online site years ago when I used to make bracelets. They sell all kinds of jewelry making stuff - you'll spend hours exploring their website!

Have fun!

StumbleUpon.com

Tuesday, June 2, 2009

Serenity's Dress Recon From A Man's Button Shirt!

I found a really neat & free tutorial on Craftster a while back and finally got around to trying it out tonight.

Cheytown submitted a unique and very helpful picture tutorial that shows you how to deconstruct a man's button shirt, and then reconstruct it into the cutest little toddler sundress. I bookmarked the site and kept telling myself I would find time to make this dress - someday!

Since my husband would never willingly buy, much less wear a button shirt, I picked up a couple of men's long-sleeve button shirts at Goodwill for only $2.99 each over a week ago. I was sick all last week and didn't get to do any projects. I was feeling somewhat better today, so figured I could handle sewing this very easy dress.

I love the results! Serenity likes her new dress too! Here she is wearing it and posing so pretty for me:


After having a little fun playing around with Pioneer Woman's Action Set 1 and Set 2 (both are free) for Photoshop, I got these beautiful results (simply by clicking one button):


Pretty neat, huh? Don't 'cha want to go check out Pioneer Woman's blog now? Ree has her hands full! She lives on a real, honest to gosh ranch, does cooking, photography, gardening, homeschooling AND finds time to create an awesome blog! I'm so impressed and awed by her!

Now back to the pattern! I did some things slightly different than the tutorial, but it's so easy to make you can customize however you want with no problem. I love the little ruffle straps on this dress! Aren't they adorable?

I also found a pattern on Etsy for another style dress using a man's button shirt. It's a PDF pattern called the Poppy Halter Shirt Dress ($8.50) by Lavender Kitty. Pretty! I bought the second shirt at Goodwill to make this dress too. I'll post some pictures when I've finished sewing it.

It's such a cute concept to take one of Daddy's (or Grandpa's) old button shirts and remake it for your little Princess. I've got my eye on my Daddy's wild Hawaiian tropical print shirt I saw him wearing the other day. I think I might snatch it!

UPDATE: Click here for another free tutorial!

Have fun sewing!

StumbleUpon.com
Related Posts with Thumbnails